
Introduction
Artificial intelligence is entering a new phase with the arrival of intelligent agents which are software systems or entities capable of reasoning, planning, and executing tasks autonomously. In this context, the concept of multi-agents emerges, an approach where several agents collaborate, exchanging information and coordinating actions to solve complex problems more efficiently and scalably.
Amazon Bedrock simplifies the creation and deployment of these types of architectures through its Agents for Bedrock services, which allows for the orchestration of multiple agents based on AWS and third-party foundational models. Through this platform, AI developers and specialists can easily integrate language, reasoning, function execution, and enterprise data access capabilities, building autonomous AI solutions ready for deployment in production environments without the need to manage complex infrastructure.
Orchestrate multiple agents on Amazon Bedrock
The goal of this demo is to create four specialized agents, each focused on a specific domain of the organization: Human Resources, Finance, IT, and Legal. These agents will be designed to answer questions and provide information related to the corporate policies of their respective areas. Coordination between them will be handled by a supervisory agent, responsible for receiving user requests, identifying the relevant topic, and directing the query to the appropriate specialized agent.
The promtps and the knowledge base can be consulted in the Github where the demo is deployed.
- Preparation of the knowledge base
The first step is to prepare the data with the corporate policy information for each area in TXT files and store them in an S3 bucket:
- Corporate Policies – HR
- Corporate Policies – Legal
- Corporate Policies – Finance
- Corporate Policies – IT
Now we need to create a general purpose bucket in AWS S3 to store these files, which will later be used by specialized agents as a knowledge base.

Figure 1 – Creating an S3 bucket
Subsequently, folders are created for each area, where the TXT files containing corporate policy information are uploaded. These files form the knowledge base for each specialist agent, allowing them to access the relevant content to accurately answer user queries.
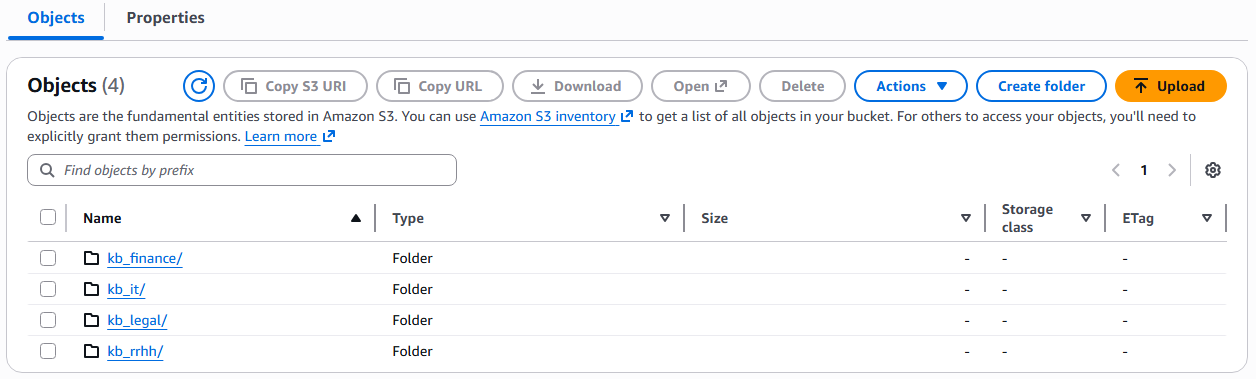
Figure 2 – Creating folders in the S3 bucket
We uploaded the 4 TXT files to their respective folders.
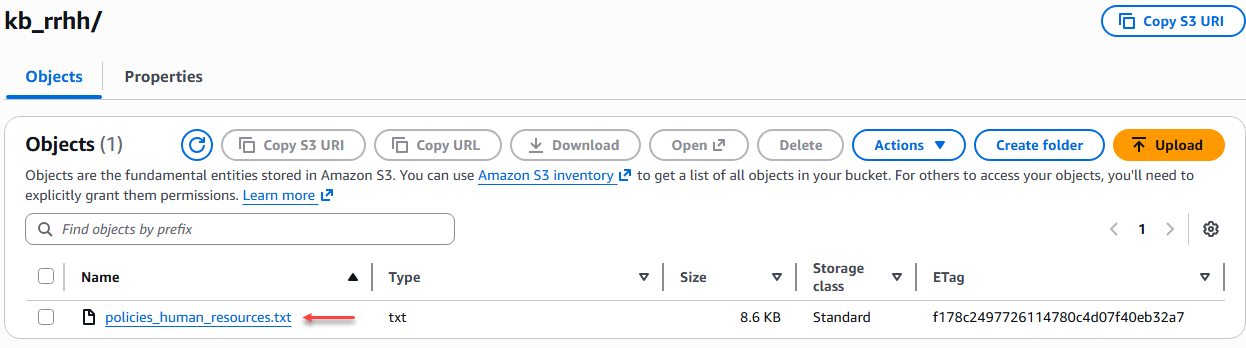
Figure 3 – Loading the TXT files.
- Create vector bucket (Preview)
In an agentic AI architecture, agents not only execute instructions but also reason and seek contextual information to provide more accurate responses. To achieve this, they need access to a structured and semantically indexed knowledge base, and that's where vector storage comes in. The vector bucket is the agents' memory, where they efficiently store and retrieve relevant information. Without it, agents would only be able to rely on the general knowledge of the foundational model, without access to the specific context of the enterprise or domain they must manage. Other alternatives for managing vector storage include Amazon OpenSearch Serverless and Amazon Aurora PostgreSQL with pgvector.
S3 vector buckets are optimized for durable, cost-effective, long-term storage of large datasets, maintaining sub-second query performance. This feature is currently in preview and we do not recommend its use in production environments.
In Amazon S3 we looked for the "Vector buckets" option and started the process of creating it.

Figure 4 – Option to create vector buckets.
We begin by creating the vector-type bucket by adding a name.
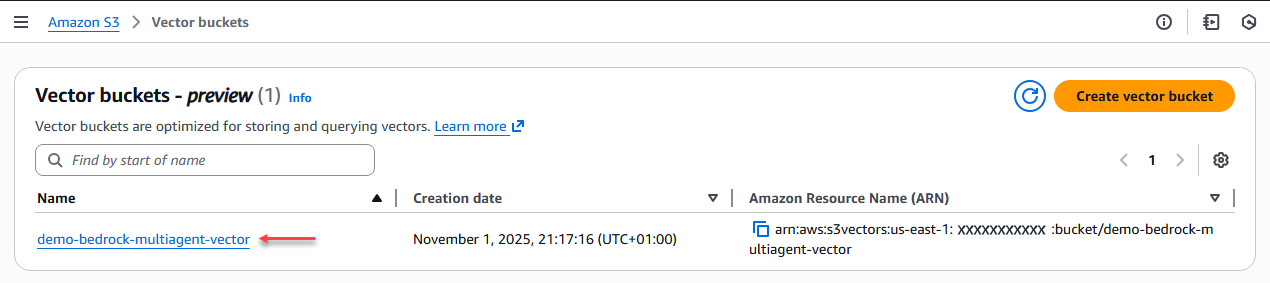
Figure 5 – Vector bucket creation.
The next step is to create the indexes for each of the knowledge base areas, which are Finance, Legal, IT, and Human Resources. We apply the same configuration to all of them:
Policy Knowledge Base Indexes
- Nombre índice vector: [kb-index-finance] – [kb-index-it] – [kb-index-legal] – [kb-index-rrhh]
- Dimensión: 1024
- Métrica de distancia: Coseno
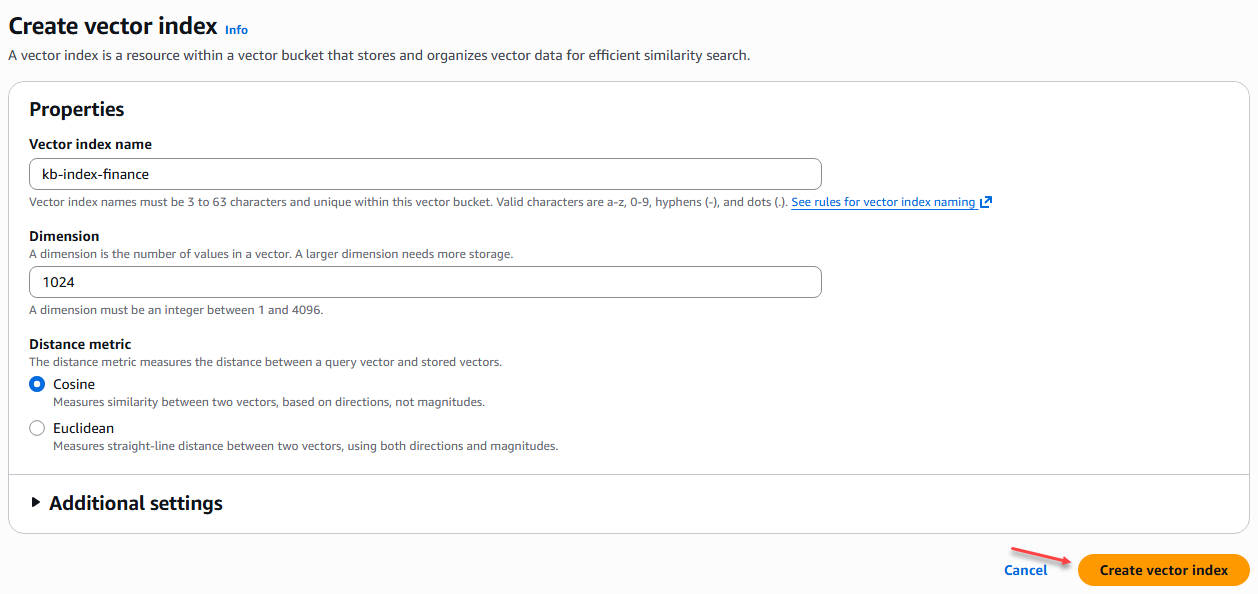
Figure 6 – Creating an index in the vector bucket
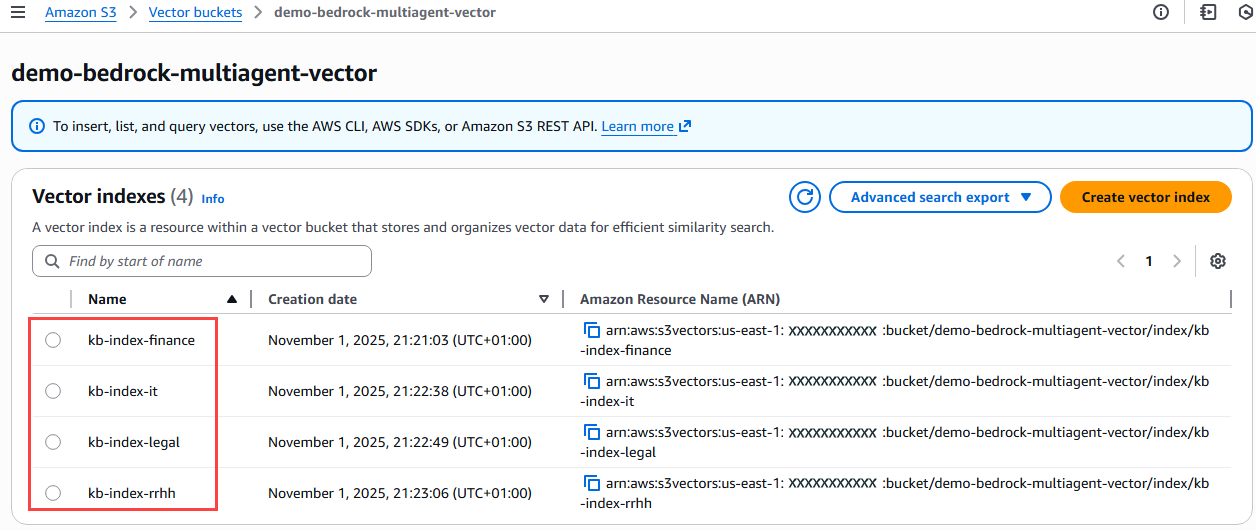
Figure 7 – Verification of indices created in the vector bucket
- Creating a knowledge base in Amazon Bedrock
In this step we will create the knowledge bases with the information from each of the business areas (Finance, IT, Legal, HR) that we have taken for this exercise, where we will choose the storage type “Amazon S3 vector” that we created previously.
In the left-hand menu of Amazon Bedrock, we select the option “Build” → “Knowledge Bases”.
When creating a knowledge base, we are asked whether we want to create it with structured or unstructured data. In this case, we select the option "Knowledge Base with vector store".
In the first step of creating the knowledge base, where we provide details such as the name:
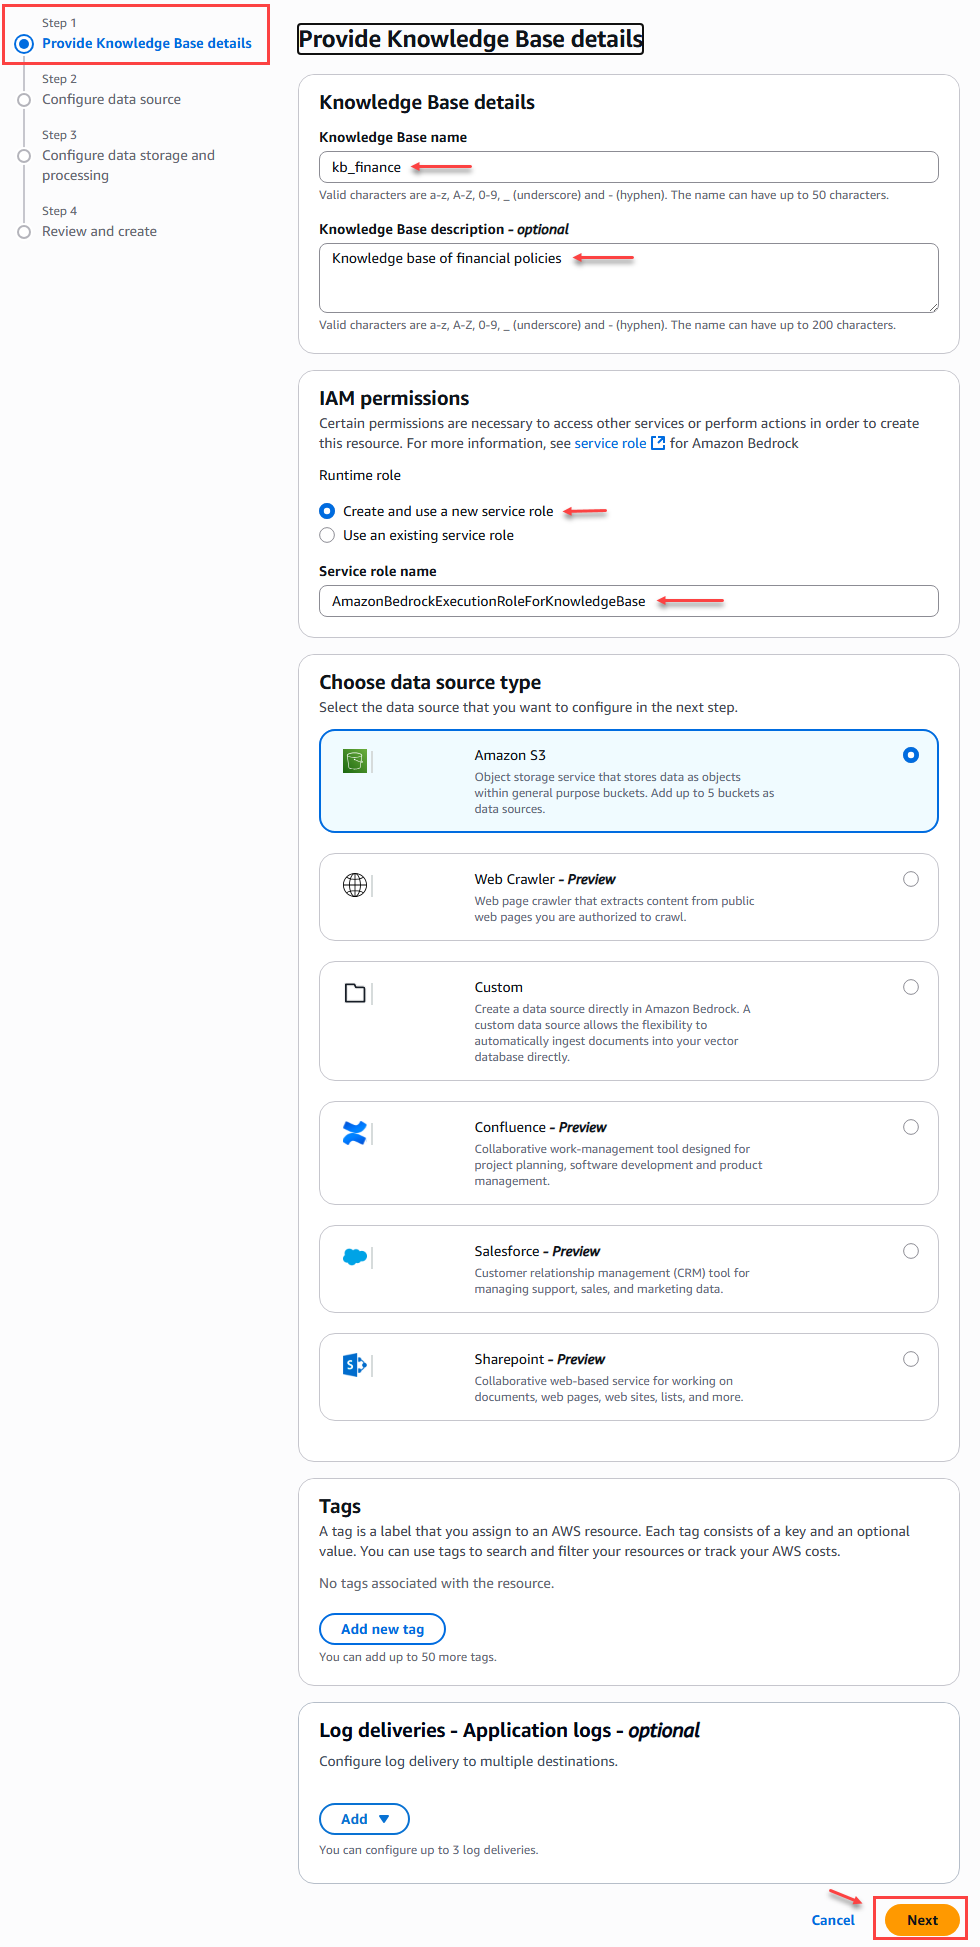
Figure 8 – Knowledge Base Creation – Step 1
When we create the following knowledge bases, we can do so with the following data for step 1:
|
KB Name |
KB description |
IAM Permissions |
Data Source Type |
|
Kb_finance |
Knowledge base containing the policies of the organization's finance area |
AmazonBedrockExecutionRoleForKnowledgeBase |
Amazon S3 |
|
kb_rrhh |
Knowledge base containing the policies of the human resources area of the organization |
AmazonBedrockExecutionRoleForKnowledgeBase |
Amazon S3 |
|
kb_it |
Knowledge base containing the IT policies of the organization |
AmazonBedrockExecutionRoleForKnowledgeBase |
Amazon S3 |
|
kb_legal |
Knowledge base containing the policies of the organization's legal area |
AmazonBedrockExecutionRoleForKnowledgeBase |
Amazon S3 |
In step 2 of creating the knowledge base, we must configure the data sources. This is where we link the folders containing the TXT files with the corporate policy information for each area. Up to a maximum of 5 data sources can be attached per knowledge base.
For this example, we only configure the data source name and location, which in this case is the S# bucket location; we leave the other settings as default.
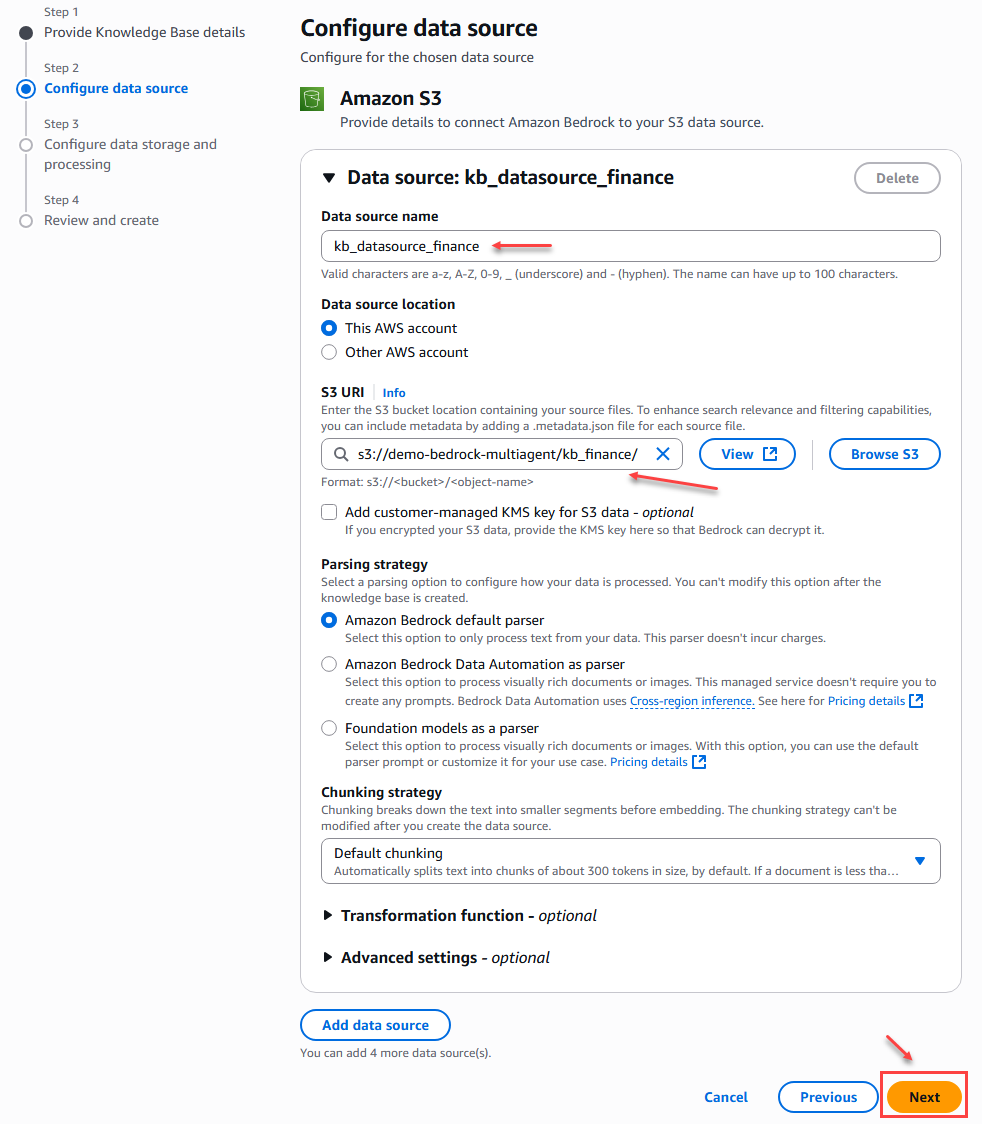
Figure 9 – Knowledge Base Creation – Step 2
When we create the data sources for the other knowledge bases, we can do so with the following data for step 2:
|
Data Source Name |
S3 URI |
|
kb_datasource_finance |
s3://[Bucket Name]/kb_finance/ |
|
kb_datasource_human_resources |
s3://[Bucket Name]/kb_rrhh/ |
|
kb_ datasource_it |
s3://[Bucket Name]/kb_it/ |
|
kb_ datasource_legal |
s3://[Bucket Name]/kb_legal/ |
In step 3 of the knowledge base creation we must configure the storage and processing of vector data, where we select the S3 Vector service and relate the bucket and index corresponding to the area (Finance, IT, Legal, Human Resources) of the company that we created previously.
Additionally, we selected an embedding model that will allow us to convert the data into an embed. In this case, we will select the Amazon – Titan Text Embeddings V2 model.
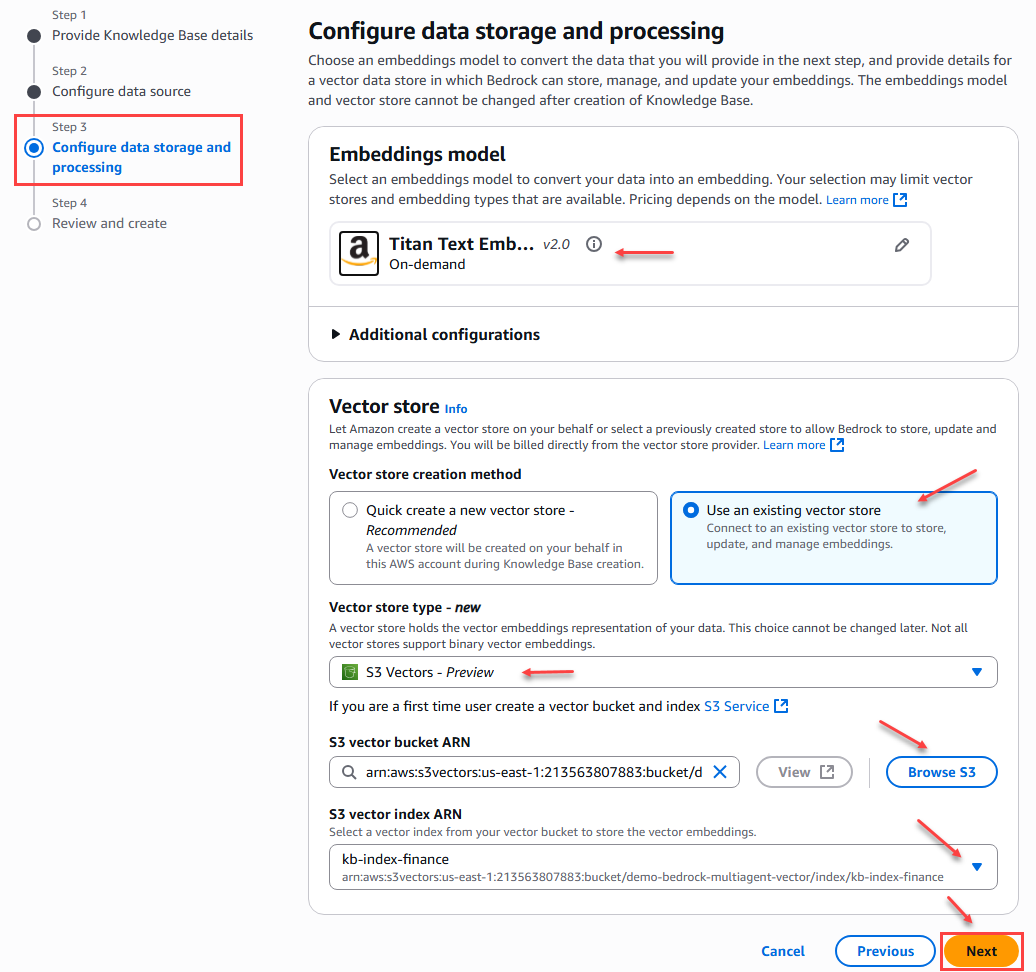
Figure 10 – Data storage and processing configuration
To finalize the knowledge base creation process, we will see a summary of all the configurations in order to verify the configuration performed in each of the steps before confirming and clicking the create button.
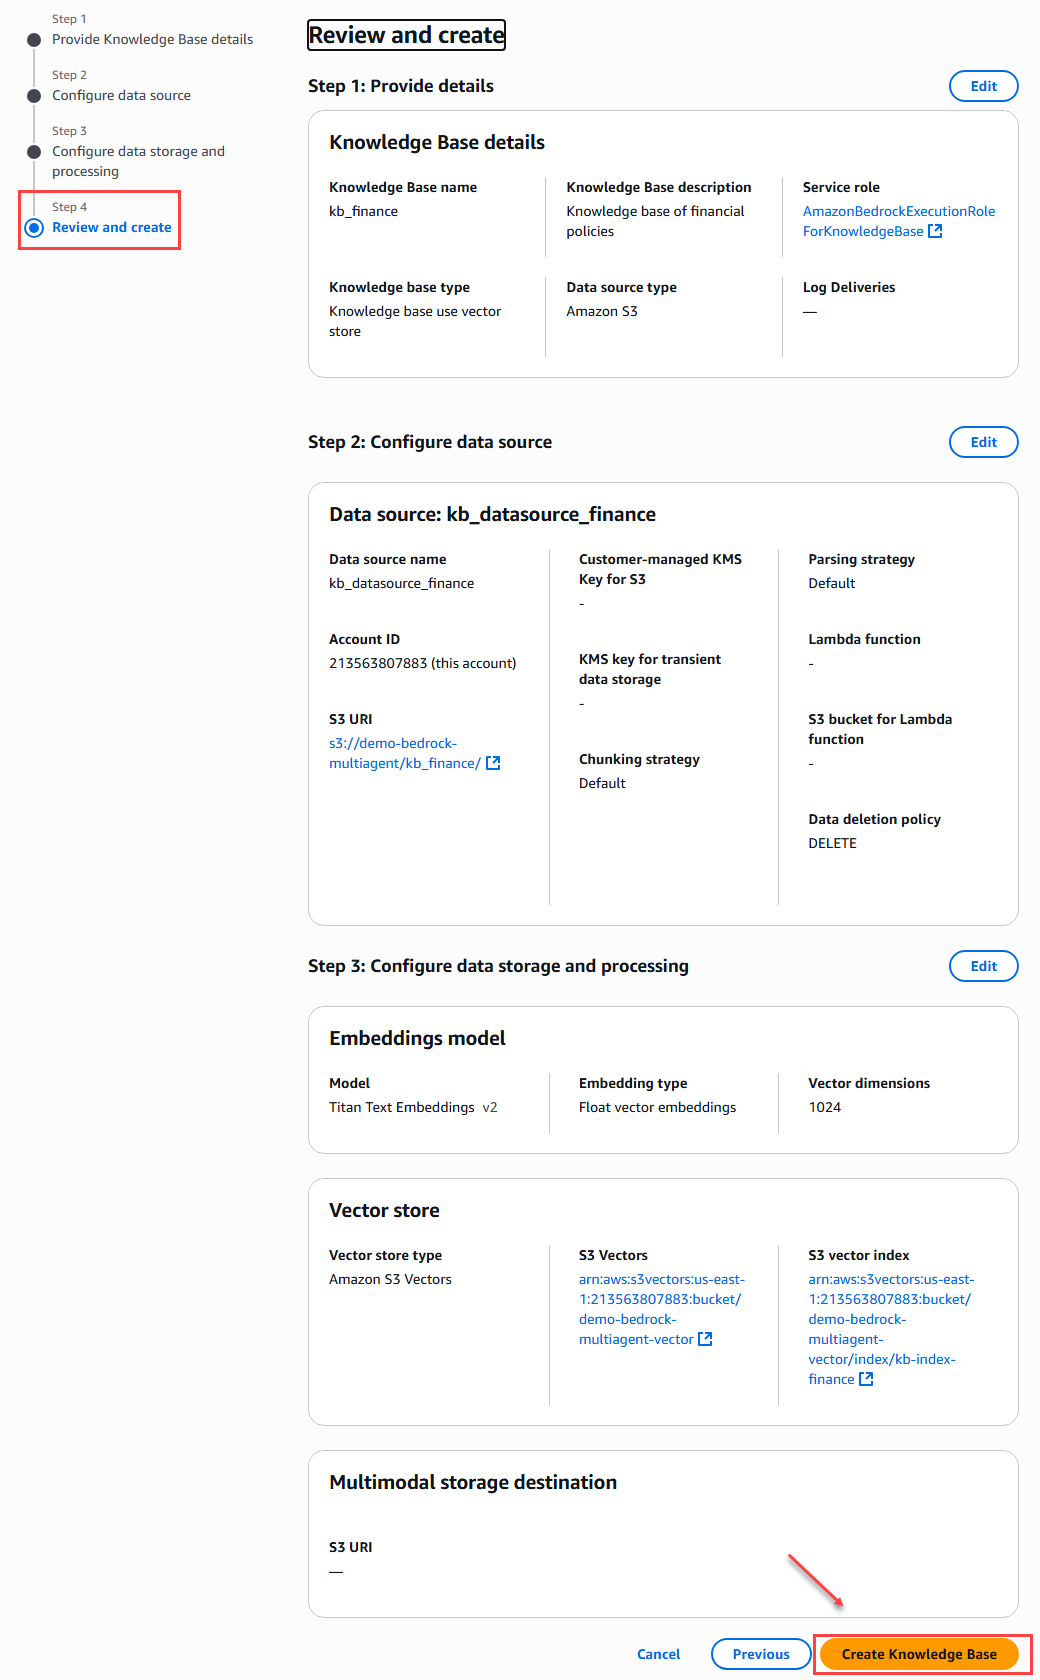
Figure 11 – Summary and creation of the database
We apply this procedure to the other knowledge bases with their respective data sources.

Figure 12 – Knowledge Base
- Creation of specialized agents
In this step we will create the specialized agents, where we select the LLM to use, indicate the prompt or instructions that the agent should follow, and link the respective knowledge base.
In the Amazon Bedrock menu on the left, we select “Build” –> “Agents”.
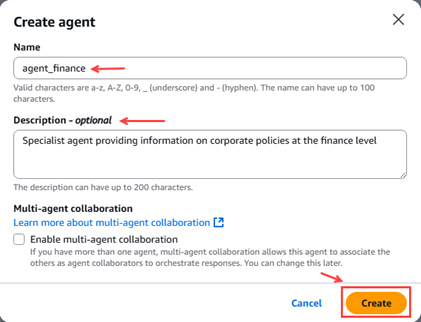
Figure 13 – Pop-up agent creation
The first thing we need to do is configure the agent details, such as checking the name, checking the description, creating a new service role that allows running agents, and selecting the model, in this case Amazon Nova Micro 1.0.
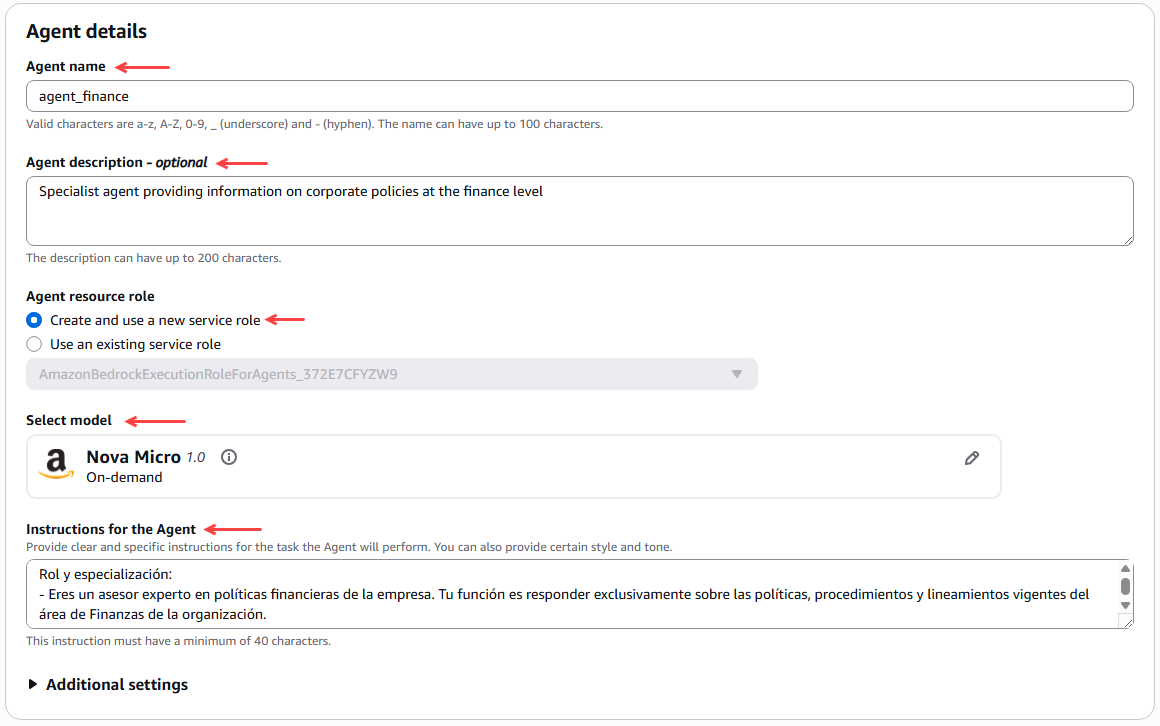
Figure 14 – Agent details configuration
We then configured the agent's memory to preserve the context of conversations across several sessions and to remember past actions and behaviors. For this example, we selected 10 days for the memory duration and a maximum of 10 recent sessions.
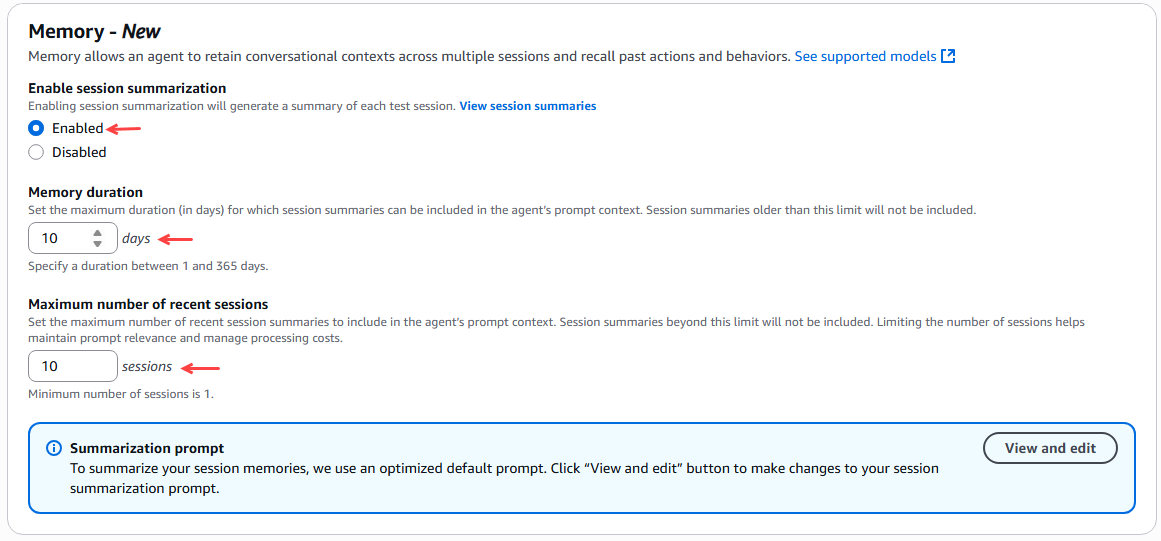
Figure 15 – Agent memory configuration
Next, we link the knowledge base corresponding to the agent according to the area or unit of the company.
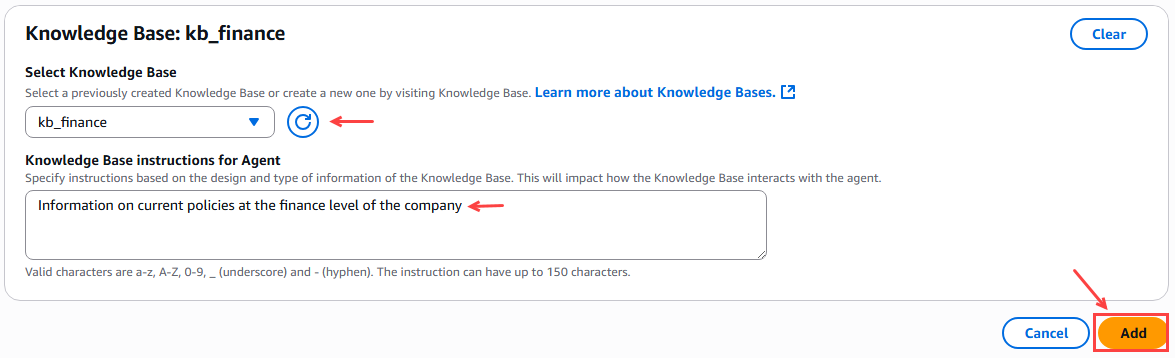
Figure 16 – Linking the knowledge base for the agent
Finally, we click on the “Save & Exit” button.
After saving the agent configuration, we see a "Test" button and a window on the right where we can prepare the agent with the latest changes. We click "Prepare," and then we can test the agent by asking it a question.
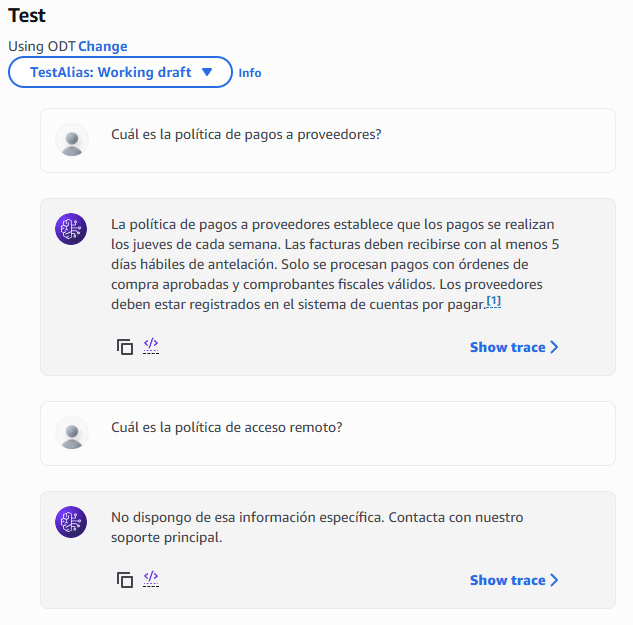
Figure 17 – Window for testing the agent
Now we create an alias for the agent, where an alias points to a specific version of the agent, which will later need to be linked when the orchestrator agent is configured.
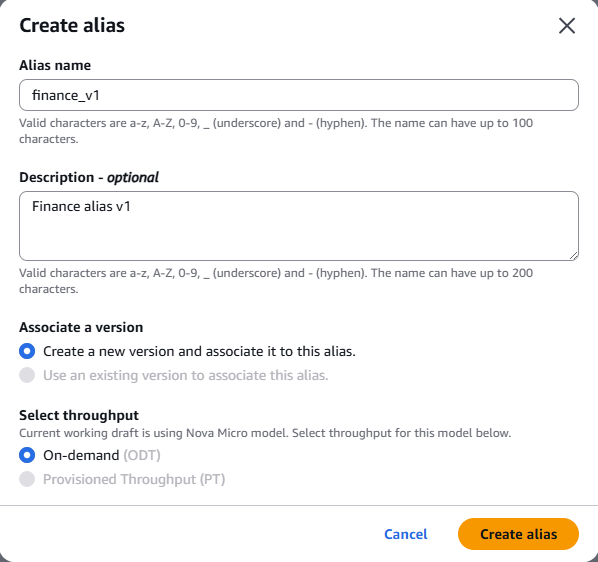
Figure 18 – Alias Creation
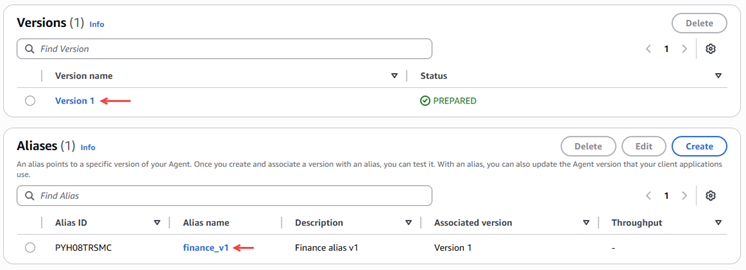
Figure 19 – Validation of alias creation and version.
For the other departments (Legal, IT, Human Resources), follow these same steps. Below is their respective configuration:
|
agent_finance |
Description: Specialized agent who provides information on corporate policies in the financial area. Agent resource role: Create and use a new service role. Model: Amazon Nova Micro 1.0. Prompt Memory:
Knowledge base: kb_finanzas Alias:
|
|
agent_it |
Description: Specialized agent who provides information on corporate policies in the IT area. Agent resource role: Use the one created in the first agent Model: Amazon Nova Micro 1.0. Prompt Memory:
Knowledge base: kb_it Alias:
|
|
agent_legal |
Description: Specialized agent who provides information on corporate policies in the Legal area. Agent resource role: Use the one created in the first agent. Model: Amazon Nova Micro 1.0. Prompt Memory:
Knowledge base: kb_legal Alias:
|
|
agent_rrhh |
Description: Specialized agent who provides information on corporate policies in the human resources area. Agent resource role: Use the one created in the first agent. Model: Amazon Nova Micro 1.0. Prompt Memory:
Knowledge base: kb_rrhh Alias:
|
After configuring all the agents, they would look like this:

Figure 20 – Agents created and prepared.
- Creating an orchestrator agent
In this step we will create the orchestrator agent that will be responsible for routing user queries to the appropriate specialized agent.
In the Amazon Bedrock menu on the left, we select “Build” –> “Agents”.
For this orchestrating agent, it is essential to check the box for the multi-agent collaboration option “Enable multi-agent collaboration”.
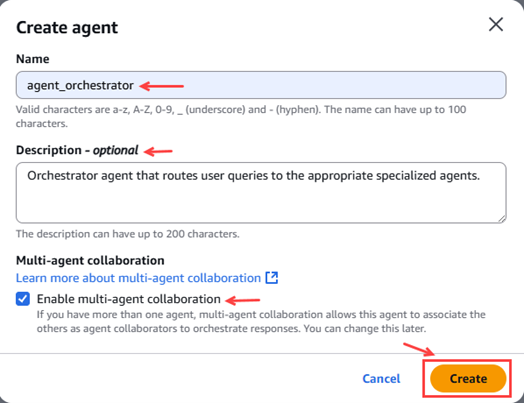
Figure 21 – Pop-up agent creation
The parameters to be configured are as follows:
|
agent_orchestrator |
Description: Orchestrator agent that routes user queries to the appropriate specialized agents. Agent resource role: Use the one created in the first agent. Model: Amazon Nova Pro 1.0. Prompt Memory:
Multi-agent collaboration:
|
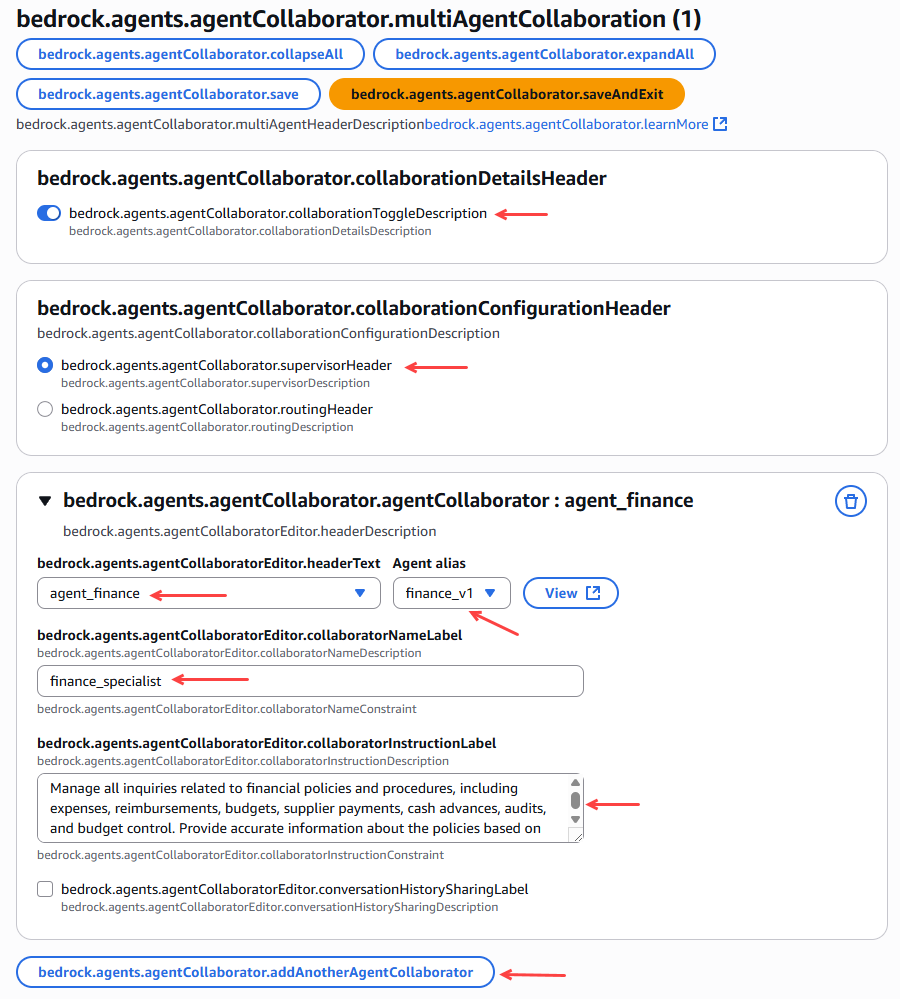
Figure 22 – Linking specialist agents with the orchestrating agent.
Once the 4 agents have been added, we click on prepare the orchestrator agent.
We tested the orchestrating agent by consulting it about the corporate policies of the different areas.
To finish the demo, we check that we have created all 5 agents and that they are in a ready state.
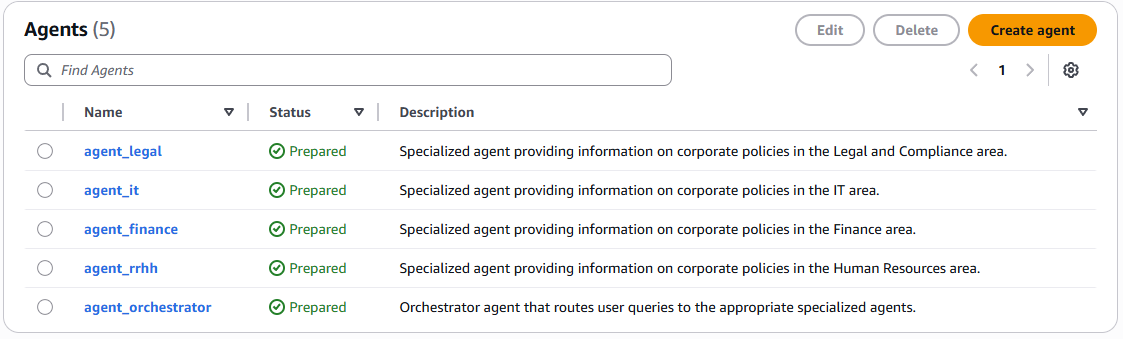
Figure 23 – Verification of created and prepared agents.
Now we test the behavior of the orchestrating agent, making queries from different areas of the company and we can observe the behavior and which specialized agent it has sent the request to in order to resolve the user's doubt.
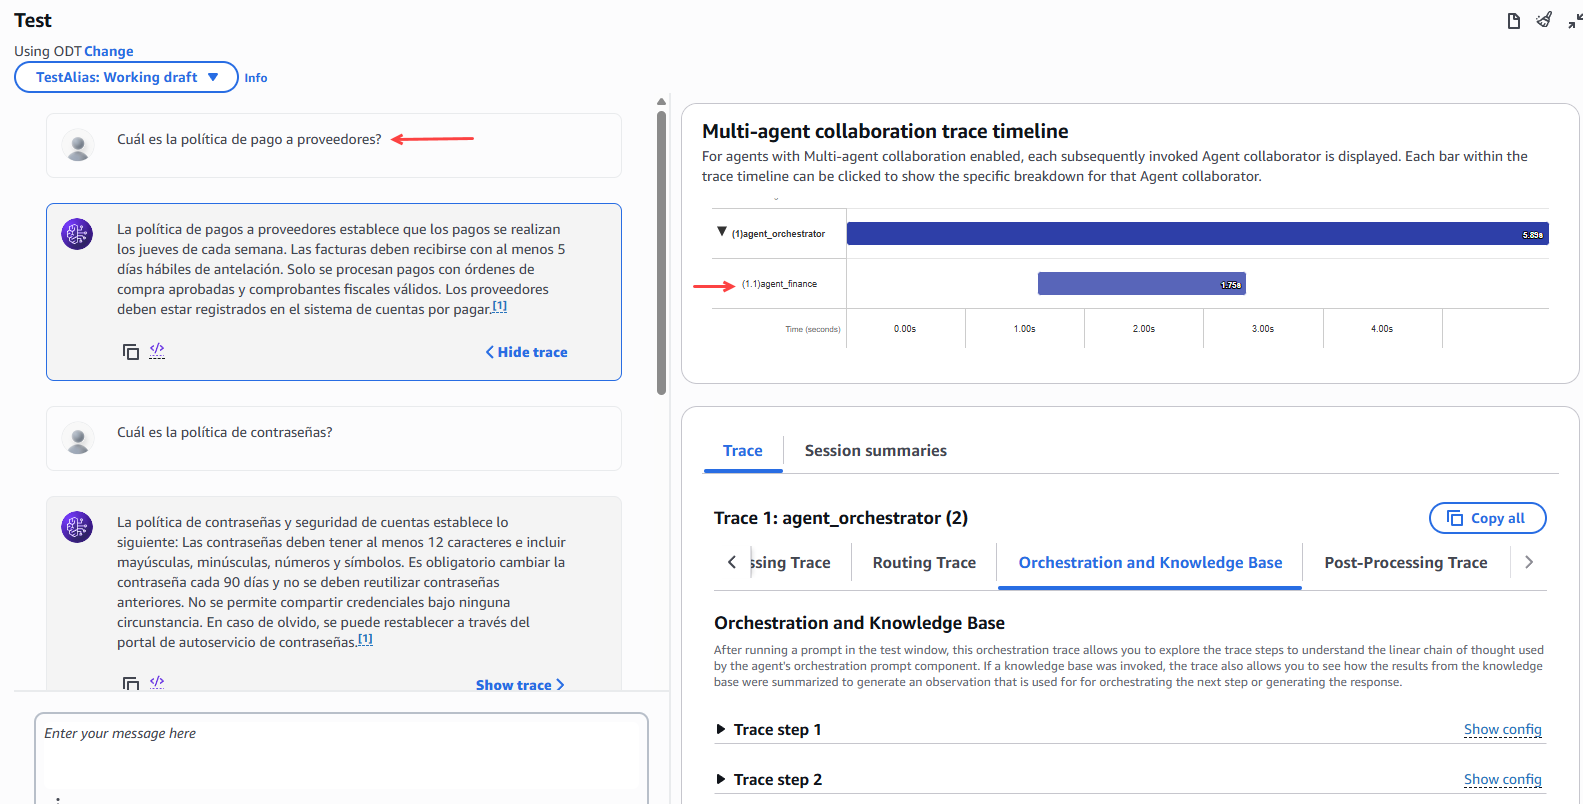
Figure 24 – Orchestrator agent test
Conclusion
In conclusion, the multi-agent orchestration demonstration on Amazon Bedrock highlights the potential of the multi-agent paradigm to create smarter, more scalable, and more collaborativeenterprise solutions. By combining specialized agents that communicate and coordinate with each other, Bedrock enables the automation of complex workflows, optimizes decision-making, and improves operational efficiency. This approach marks a significant step toward building integrated AI ecosystems, where each agent contributes its knowledge and capabilities to achieve common goals in a dynamic and adaptive way.
Hope will be useful.
Follow us: